BLACK BOX TESTING WITH ROBOTIUM ON APK FILES
Requirements:
Requirements:
1) Android application apk file for Testing.
Ex: ApplicationToTest.apk
2) Eclipse for building Test project
3) ADT (Android Development Tools)
4) SDK (Software Development Kit)
5) JDK (Java Development Kit)
6) robotium-‐solo-‐1.7.1.jar
Prerequisites for creating test project:
* Install eclipse, ADT, SDK, JDK to your system.
* After installation give proper path in environmental variable
[For more help go to: http://developer.android.com/guide /index.html ]
[To download the robotium-‐solo-‐1.7.1.jar and Javadoc:
http://code.google.com/p/robotium/downloads/list ]
NOTE: In this example the application apk file has the following package name: “com.Example.ApplicationToTest” and the apk name is: ApplicationToTest.apk
STEP 1: CREATE TEST PROJECT IN ECLIPSE
Create the test project by:
File -> New -> Project -> Android -> Android Test Project
File -> New -> Project -> Android -> Android Test Project

The window below will open:
Fill all the following fields to create the test project:
* Test Project Name: ExampleApplicationTesting
* Test Target: Click on “This Project “
* Build Target: If the application was developed using SDK version7 then select Android 2.1 – update1. If it was developed by SDK version 8 then select Android 2.2
* Properties: Application name: ApplicationTesting
* Package name: com.Example.ApplicationTesting
* Min SDK version: Default value will be there according to Build Target selection
Then click on “finish”
A new project with the name: ExampleApplicationTesting is created.
STEP 2: DO THE FOLLOWING CHANGES IN “AndroidManifest.xml”
Open package “ExampleApplicationTesting” there you will find the file AndroidManifest.xml

Open the AndroidManifest.xml

Change:
<instrumentation android:targetPackage="com.Example.ApplicationTesting"
To:
<instrumentation android:targetPackage="com.Example.ApplicationToTest"
If you do not know the exact package name then type this in the DOS prompt
> launch the emulator
> adb install testapplication.apk
> adb logcat
Run the application once and you will get the exact package name
STEP 3: CREATE SAMPLE TEST CASE
Select the package and right click it and select: New -> Class
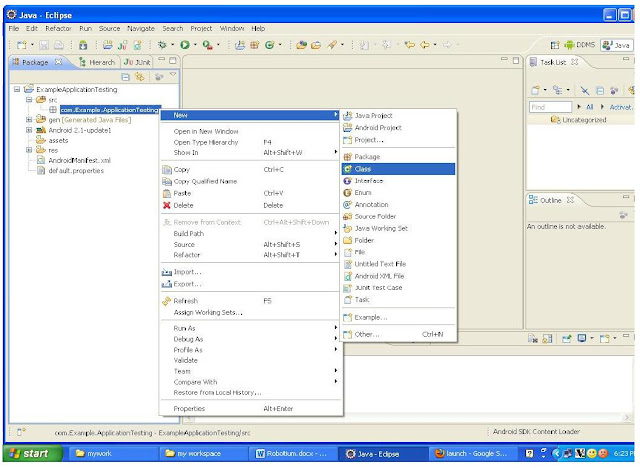
Use the class name: ExampleTest and click on “finish”

Now the editor should look like:

Copy this code into the editor:
import com.jayway.android.robotium.solo.Solo;
import android.test.ActivityInstrumentationTestCase2;
@SuppressWarnings("unchecked")
public class ExampleTest extends ActivityInstrumentationTestCase2 {
private static final String TARGET_PACKAGE_ID = " com.Example.ApplicationToTest ";
private static final String LAUNCHER_ACTIVITY_FULL_CLASSNAME = "
com.Example.ApplicationToTest.MainMenuSettings";
private static Class<?> launcherActivityClass;
static{
try {
launcherActivityClass = Class.forName(LAUNCHER_ACTIVITY_FULL_CLASSNAME);
} catch (ClassNotFoundException e) {
throw new RuntimeException(e);
}
}
@SuppressWarnings("unchecked")
public ExampleTest() throws ClassNotFoundException {
super(TARGET_PACKAGE_ID, launcherActivityClass);
}
private Solo solo;
@Override
protected void setUp() throws Exception {
solo = new Solo(getInstrumentation(), getActivity());
}
public void testCanOpenSettings(){
solo.pressMenuItem(0);
}
@Override
public void tearDown() throws Exception {
try {
solo.finalize();
} catch (Throwable e) {
e.printStackTrace();
}
getActivity().finish();
super.tearDown();
}
NOTE:
private static final String TARGET_PACKAGE_ID = " com.Example.ApplicationToTest ";
private static final String LAUNCHER_ACTIVITY_FULL_CLASSNAME = "
com.Example.ApplicationToTest.MainMenuSettings";
In this example the " com.Example.ApplicationToTest “ is the package name.
“MainMenuSettings” is the launcher activity name. It should look like this:
private static final String LAUNCHER_ACTIVITY_FULL_CLASSNAME =packagename.launchername
If you do not know the exact package and launcher names follow these steps in the DOS prompt
> launch the emulator
> adb install testapplication.apk
> adb logcat
The exact package name and launcher name will be printed
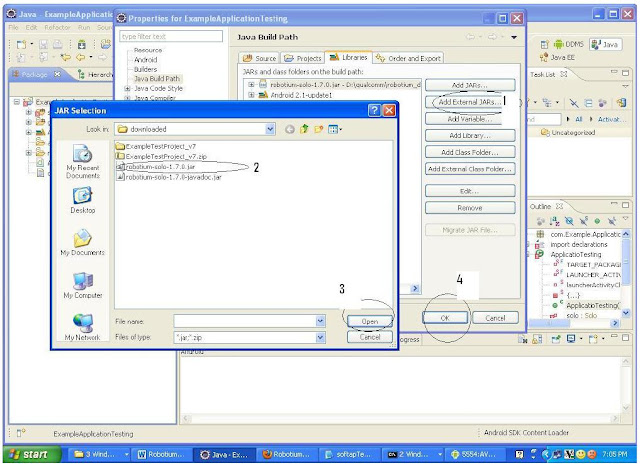
Add the latest version of the robotium jar file to the project.
Right click on “ExampleApplicationTesting” project -> Build path -> Configure Build Path
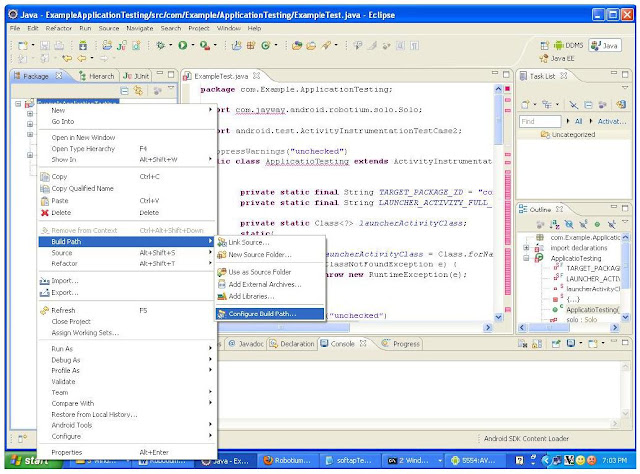
Then select Add External Jars -> select robotium jar file -> Open -> OK
STEP 4: The apk file has to have the same certificate signature that your test project has
Signature:
The signature will identify the author of the android application. Signature means it contains the
information like first name and last name of the developer, Name of the organizational unit,
organization, city, state, two-‐letter country code.
Standard tools like Keytool and Jarsigner are used to generate keys and sign applications.
[For more help: http://developer.android.com/guide/publishing/app-‐signing.html ]
IMPORTANT STEPS:
* If you know the certificate signature then you need to use the same signature in your test project
* If you do not know the certificate signature then you need to delete the certificate signature and you should use the same android debug key signature in both the application and the test project
* If the application is unsigned then you need to sign the application apk with the android debug key
If the application is signed then you can use the following bash script:
http://robotium.googlecode
Or
-‐-‐ Un-‐zip the apk file
-‐-‐ Delete the META-‐INF folder
-‐-‐ Re-‐zip the apk file
-‐-‐ In Dos prompt /Command prompt
> jarsigner -keystore ~/.android/debug.keystore -storepass android -keypass android ApplicationToTest.apk androiddebugkey
> zipalign 4 ApplicationToTest.apk TempApplicationToTest.apk
Then rename TempApplicationToTest.apk to ApplicationToTest.apk
Right click on “ExampleApplicationTesting” project -> Build path -> Configure Build Path

Then select Add External Jars -> select robotium jar file -> Open -> OK

STEP 4: The apk file has to have the same certificate signature that your test project has
Signature:
The signature will identify the author of the android application. Signature means it contains the
information like first name and last name of the developer, Name of the organizational unit,
organization, city, state, two-‐letter country code.
Standard tools like Keytool and Jarsigner are used to generate keys and sign applications.
[For more help: http://developer.android.com/guide/publishing/app-‐signing.html ]
IMPORTANT STEPS:
* If you know the certificate signature then you need to use the same signature in your test project
* If you do not know the certificate signature then you need to delete the certificate signature and you should use the same android debug key signature in both the application and the test project
* If the application is unsigned then you need to sign the application apk with the android debug key
If the application is signed then you can use the following bash script:
http://robotium.googlecode
Or
-‐-‐ Un-‐zip the apk file
-‐-‐ Delete the META-‐INF folder
-‐-‐ Re-‐zip the apk file
-‐-‐ In Dos prompt /Command prompt
> jarsigner -keystore ~/.android/debug.keystore -storepass android -keypass android ApplicationToTest.apk androiddebugkey
> zipalign 4 ApplicationToTest.apk TempApplicationToTest.apk
Then rename TempApplicationToTest.apk to ApplicationToTest.apk
If it is an unsigned application then:
-‐-‐ In Dos prompt /Command prompt
> jarsigner -keystore ~/.android/debug.keystore -storepass android -keypass android ApplicationToTest.apk androiddebugkey
> zipalign 4 ApplicationToTest.apk TempApplicationToTest.apk
Then rename TempApplicationToTest.apk to ApplicationToTest.apk
[For more help: http://developer.android.com/guide/publishing/app-‐signing.html }
STEP 5: RUN THE EXAMPLE TEST CASES
Right click on the test project -> Run As -> Android JUnit Test

STEP 6: RUNNING TEST CASES ON THE EMULATOR/DEVICE WHEN NOT USING ECLIPSE
* Use adb to Install the application apk:
> adb install ApplicationToTest.apk
* Use adb to install the test project apk:
> adb install ExampleTesting.apk
* Run the test cases:
> adb shell am instrument -w com.Example.ApplicationTesting/android.test.InstrumentationTestRunner
No comments:
Post a Comment